INFORMATION STORAGE & RETRIVAL
Introduction
The very first question that comes in everyone’s mind is – what is information? Let us start with a question: what does the number 32 means? It could mean many things. It’s meaning depends on the qualification one attaches to that number. If you attach this number with a person age then that implies he is 32 years old. Similarly if you attach this number with a Fahrenheit temperature then that implies the temperature at which water turns to ice? Likewise the number – 32 will give us different picture as its reference properties change, e.g. length, pressure, etc., and each situation requires different plan and action. Thus the knowledge about a number makes it information and information enables us to plan, and equips us to take appropriate action. The same concept of information is applied to computer world. Information is a term that defines the raw facts (data) in a meaningful format.
Basic Terminology of Information System
Let us study some basic terminology, which are required while studying about data and information.
Data - The word – data is the plural of “datum” though “data” is commonly used as both in the singular and plural forms. The term data simply refers to a value or set of values. These values may represent some observations from an experiment, marks obtained by a student in an examination, some figures collected during some survey, etc. Data can take form of alphanumeric characters or special symbols, like $, %, @ et.
Data Item - A set of alphanumeric characters which are used together to represent a specific data element. For example, name, temperature, day, year, age, salary and address are data items.
Entity - An entity is something that has certain attribute or properties, which may be assigned values. The values assigned may be either numeric or non-numeric. For example, an employee is entity. The possible attributes for an employee can be name, age, salary and address. The possible values for these attributes can be “Aryan”, 17, 24800.50 and “DaryanGanj, Delhi” respectively.
Entity Set - An entity set is a collection of similar entities. For example, employees of an organization, students of a class, etc., forms an entity set.
Record - A record is basically a collection of related data items. In fact a record represents an entity. For example, name, roll number, semester and address or a particular students may be “Mohan Kumar”, 015002508, “Computer” and “1276, Urban Estate” respectively. Records may be either fixed-length records or variable-length records.
File - A file is a collection of related records. In fact a file represents an entity set. For example, a file may contain records of all students in a class.
Key - A key is a data item in a record that takes unique values and can be used to distinguish a record from other records. There are chances that two or more data items may have unique values. In such case, there exist multiple keys. But at a time, we may use only one data item as a key, called primary key, and other keys are then known as secondary key.
Information - Some people use the term data and information to mean the same thing. For the beginner it may be right to some extent. But in reality, information is more than just data. In simple terms, information is a processed data. Data is just a collection of values (raw data), from which no conclusions can be drawn. In other words you can say that data can not be used from decision making. On the other hand, information conveys some meaningful ideas for decision making.
Information Storage and Retrieval
Information storage (IS) deals with that part of database systems which keep the records at a proper place and in proper format so that it can be used later on when needed. Information retrieval (IR) is process of searching for information in documents, searching for documents themselves, or searching within databases. Actually the information retrieval techniques depend highly on information storage techniques.
Why do we need Information Storage and Retrieval Systems
Before answering this question one must be sure that he/she wants to keep his/her data for long time. And only solution to this problem is information system.
- Information system need to store information so that they can manipulate it at a later time, e.g. day-end, month-end, year-end
And once you store information then you may need to access after some hours, some days, some months or even after some years. Again only solution to this problem is information system.
- Information system can retrieve the information they have acquired in a fast and accurate manner, or else the information system will not perform as expected and required
Information Storage Techniques
There are, broadly, two major options when storing data/information in an information system:
- Use a Traditional File Environment (TFE)
- Use a Database Management Systems (DBMS)
The choice of which option to choose is determined by many factors, e.g. cost, available expertise, suitability to the problem, etc.
Traditional File Environments
This type of storage mechanism was the first to evolve because it is relatively easy to implement, e.g. in COBOL. In traditional file environments, records are stored on storage devices in either sequential or random-access file organizations. And it all depends upon the environment it is intended to use. Different applications may use either type of file access with a greater or lesser efficiency.
1. Sequential/indexed sequential file access methods
In sequential file organisation data records must be retrieved in the same sequence as which they were stored. This type of access method can be used with magnetic tape storage
Indexed sequential file access methods store files sequentially but allow records to be accessed in any order using an index of key fields. The index consists of a list of record keys and their associated storage location. This method can be used for sequential processing of large number of records in batch mode.
The diagrams illustrate these two methods of organising data.

2. Random (Direct) file access methods
Random access method uses a key field to access the physical location of a record. This method uses mathematical formula called a randomising or hash algorithm to translate the key field into the records physical location.
This method is most appropriate for applications requiring records directly and rapidly for immediate online processing e.g. online order processing application
The diagram illustrates the direct file access method, where 4467 is contents of the record key. 997 is a prime number and 479 is the address of the record.

Problems with the Traditional File Environment
The traditional file system suffers from following problems:
Cost:
- each application must typically be created, documented, and maintained separately
- there are numerous data files to keep track of
- work is often duplicated (even with OO design and development tools!)
Program/Data Dependence:
- Particular programs create and manage particular files. Each program knows the structure of the data in its own data file only
- program has to explicitly know the data’s structure
- A change to the structure of the data requires a change to the program that uses it, i.e. re-program, re-test, re-compile
- Required data may be located across a number of differently-formatted files
Data Redundancy:
- Multiple copies of the same information stored in a number of different files, each managed by a different I.S., e.g. Names and Adress.
- Waste of Storage space
- Data Confusion can occur when different versions of the same information exist, i.e. one person has one address in one file.
Database Systems
A database is a file, or group of files, containing data for applications programs. Database systems are provided by special software called as Database Management Systems (DBMS) that allow data to be stored in one place. The DBMS software manipulates the data on behalf of applications programs, as shown in figure-****.

Now the question arises - Why use Databases?
The databases can be used for the following reasons:
- Removes the problem of data/program dependence
- The data structure is determined by the DBMS
- Applications indirectly use the DBMS to access and change data
- Avoid Data Redundancy and Confusion
- Each piece of data is stored in one place only, so a change is only effected one, and is then generally available to all applications using .
Advantages of DBMS over T.F.E.
The DBMS has following advantages over the T.F.E.
- Data are independent of application programs. Logical views of data allows many applications to use data from a single, shared database
- Data redundancy and inconsistency are reduced, because data is stored and maintained in one location only .
- Complexity is reduced by consolidating management of data, data access, and data utilization in the DBMS
- Information is easier to access and utilize. The DBMS establishes relationships between different entities in the database.
Components of a DBMS
A typical DBMS consists of a number of components:
Data Definition Language (DDL)
DDL is a method for creating the database layout, including fields, tables, relationships etc.
Data Manipulation Language (DML)
DML is a method for adding, editing, and deleting the data in a database. Most common example of this today is SQL (Structured Query Language)
Data Dictionary (DD)
DD is a repository of data about the data in the database. It holds information such as ownership, usage patterns, source, destination, and security about each entity.
The dBASE III PLUS Database?
A database is an organized collection of related information or data. In daily life you probably encounter several databases. An institution take care of their students with names, branches, semesters, roll numbers and addresses in its record book. The average office file is a database too. It doesn’t do anything; it just holds information. Similarly your bank keeps track of your money, and accounting departments monitor their accounts payable and receivable. Each of these databases organizes data for easy storage and retrieval, or access.
Let us consider a simple database of a student card file. Each student’s name, branch, semester, roll number and address appear on a separate card, as shown in current figure .

You typically keep your databases in some order, either alphabet, by branch, or semester or perhaps by city. A database management system is a tool for managing information stored on a computer. In this unit we will study a database, dBase III PLUS, that stores and retrieve such data in a database file.
A computer database is filled with records. In other words you can say that a database file, all the data for a particular entry is called a record. A record in a database contains fields of information. For example, in the student file, each record contains all the data for one student. Each item of information within a record is called a field. Thus a database contains records, each of which in turn has several fields within it.
Creating a Structure
Now the question arises – how do you structure a database with dBase III PLUS? To implement this one must decide exactly what he/she wants to store. In earlier said example, one card of information holds a name, branch, semester, roll number, address, city, state and phone. Since each card holds the same type of information, therefore each record must contain these fields:
Name, Branch, Semester, RollNumber, Address, City, State, Phone
Here there are 8 fields in this record. It is the programmer’s responsibility to assign a meaningful piece of information to a unique field and to put the correct data in the appropriate field. It means that if you try to store Mohan Dass in Roll Number field then the computer is not going to complain about all this because it is the programmer who makes the computer to work.
Once you have structured your database, you need to manage it using several operations, such as Add, Delete, or Print. Table shows some primary operations
|
Operation |
Meaning |
|
ADD |
Adds new data to the database |
|
DELETE |
Deletes data from the database |
|
SEARCH |
Searches the database for the type of information |
|
SORT |
Arranges the database in some order |
|
EDIT |
Edits data on the database |
|
|
Prints data from database onto formatted reports |
Starting dBase III PLUS
Let you have installed dBase III PLUS on a hard disk, say C, then simply log on to the appropriate directory on the hard disk and type dbase as:
C:\> dbase
After this you will see a on-screen dBase III PLUS menu screen as shown in currentfigure- This menu is also called the Assistant, because its job is to assist you in the building commands that dBase can interpret and execute. However you can also build your own commands without the Assistant menu.

Creating a Database File
You create a new database file in following steps:
- Open the Create menu from the main menu either by moving the highlighting to the word or by typing the letter ‘C’ and select Database file from the pull-down menu
- Select the drive (A: for floppy drive, or C: for hard disk) where you want to store this new file
- 3. After this the dBase III PLUS prompts – Enter the name of the file:
- Type student (Use the Backspace key to backup and make correction) as shown in current figure , the filename can be up to eight characters long, but it may not contain spaces or punctuation marks and press Enter key

As you enter the filename – student and press Enter key, you see a blank table for creating the file structure as shown in figure a

figure A
Note that the dBASE III PLUS provide the filename extension .dbf (database file). The dBASE III PLUS sets the field widths for you. It is the place where you specify the structure of your database file by typing in the field names, types and widths. Each field appears on the separate line and you can specify up to 128 fields, using one or more screens. Here we will enter only eight fields. For each field, the database must know the type of data being stored in the field.
Data can be one of five types:
Character – for non-numeric data, it may include letters, numbers, and punctuation marks, as well as numbers that won’t be calculated
Numeric – for numbers, it may include only numbers that can be calculated, a decimal point, and a leading plus (+) or minus (-) sign
Date – for dates in MM/DD/YY format
Logical – where the field is either true or false or yes/no
Memo – for long passages of text of up to 5,000 characters
The field width specifies the maximum number of characters in a field.
Now you will simply type in the field name followed by a press on Enter key, as illustrates in the following steps:
- Type Name and press Enter key
The Name field name appears (in uppercase), and the cursor moves to the field type entry. Next field is the field type.
- Press Spacebar repeatedly to display the available field types. Select the Character for Name field and press Enter key.
However you can also select a field type by typing the first letter of its name: c for character, n for numeric, d for date, l for logical, and m for memo. Next field is Width column.
- Type 20 and press Enter key. A field of 20 characters is entered, and the cursor advances to the second field.
Similarly you can enter the field names, field types and field widths of the remaining fields. When completed, the database file looks the figure b

Figure B
Saving the Database File
Once the structure is completed, you must save it before adding records to it.
- Just press the Enter key in the ninth field or Press Ctrl-End
The dBASE III PLUS prompts:
Press ENTER to confirm. Any other key to resume
- Press Enter key
After saving the database file structure, the dBASE III PLUS asks:
Input Records now?(Y/N):
Figure C shows this. Type Y to indicate that you are ready to enter data or type N to return to main menu.

Figure C
If you press Y then a blank template, or form, appears on the screen as shown in figure D.

The field names you just entered appear on the screen. Next to each field names are spaces corresponding to the width you or dBASE III PLUS assigned to that field.
Adding Records to Database File
Next you have to enter records into student file.
- Type Mohan Das using uppercase and lowercase as shown in figure 1.8 and press Enter key
- Type Computer in next field and press Enter key
- Type Sixth and Press Enter key
- Type 11108020 and Press Enter key
- Type H.No.8, Housing Board. The cursor automatically advances to the next field and the bell sounds
- Type Ambala and Press Enter key
- Type Haryana and Press Enter key
- Type 0171-231980 and Press Enter key

9. The first record is complete now. Now if you want to enter more records then press Pg Dn key. A blank record 2 appears.
10. After this enter the data from table putting each column ofdata in a separate record
|
Field Name
|
Record 2
|
Record 3
|
Record 4
|
Record 5
|
|
Name |
Viren |
Rajesh |
Amit |
Daksh |
|
Branch |
Mechanical |
Civil |
Computer |
Bio-Tech |
|
Semester |
Fourth |
Second |
Second |
Fourth |
|
RollNumber |
11298076 |
11237909 |
12277102 |
12984712 |
|
Address |
H.No. 110, Vikas Nagar |
H.No. 2, Mohan Nagar |
H.No. 139, Block-C |
H.No. 76, Urban Estate |
|
City |
Hissar |
Sirsa |
Sirsa |
Jind |
|
State |
Haryana |
Haryana |
Haryana |
Haryana |
|
Phone |
01663-244076 |
01666-221400 |
01666-224475 |
01681-249066 |
11. By Pressing Pg Up and Pg Dn you can move through the records, review them and make any corrections needed.
12. Press Ctrl-End to save the last record entered (the dBASE III PLUS saves the record you enter when you move the cursor to another record) and to exit adding records
The Assistant reappears.
Displaying and Printing Database File
In order to display and print a database file, perform the following steps:
- Open the Retrieve Menu
- Select List
- Select the option Construct a field List
A submenu of fields in student file appears in a box on the left side of the screen as shown in figure E

Figure E
- Select NAME, BRANCH, CITY, and STATE fields.
You will see your selection appear on the action line above the status bar.
- Press → key to exit the menu
- Now select Execute the command
List can either display data on the screen or print the data on paper. The dBASE III PLUS prompts you: Direct the output to the printer? [Y/N]
- Press ‘Y’ for printing the output on printer and ‘N’ for displaying the output on the monitor, as shown in figure F. If you press just Enter key then by default the N option is selected.
Press any key to return to the Retrieve Menu

Updating Records
This section shows you how to add, edit, and delete records in database files using Update menu of the Assistant. Before updating a database file, you must select it from a list of existing files. To select the Student file, perform the following steps:
- Open the Set Up menu and select Database file.
- Select the drive where the sample files are located
A submenu of database files appears.
- Select STUDENT. The dBASE III PLUS prompts : Is the file indexed? [Y/N]
- Type N
- The Set Up Menu returns.
Now you must open the Update menu. In the Update menu has following options:
Adding Records – APPEND
The APPEND option from the Update menu is used to add new records to a database file. To add new records in the Student file, perform the following steps:
1. Open the Update menu and select APPEND
A blank record appears with the cursor on the first field, as shown in figure G

2. Enter the information of new record field by field as you have entered earlier.
Name : Suresh
Branch : Electrical
Semester : Sixth
RollNumber : 11134908
Address : 7, Mehta Colony
City : Karnal
State : Haryana
Phone : 0184-2232167
- Similarly you can add some more new records.
Here one should remember that the APPEND option also allows you to display and edits previously entered records using Pg Dn and Pg Up keys.
2. Finally press Ctrl-End keys to exit APPEND.
Editing Records – EDIT
You can also edit a record from the Update Menu by performing the following steps:
1. Open the Update menu and select EDIT
The first record in the database file is displayed.
2. Press Pg Dn key
The second record is displayed.
Similarly you can go to any record. Once the appropriate record comes, use the ↓, →, ↑, and ← keys to move the cursor to the appropriate field and overwrite/delete data and make a new entry.
- Finally press Ctrl-End to save your other changes to the record.
However if you make changes to a record, but do not want to save them then press Esc key instead of Ctrl-End.
Deleting Records - DELETE
To delete records first mark them for deletion and then remove the marked records from the database file. To delete a record, perform the following steps:
- Open the Update menu and select Edit
- Move the cursor to the record that you want to delete
- Press Ctrl-U to mark the record for deletion
The record is marked, as indicated on the status bar.
- Finally press Ctrl-End keys to exit Edit.
So far you have only marked records for deletion. You can still display and edit marked records. To remove marked records from a file, use the Pack option from the Update Menu.
However if you want to delete a number of records then use the Delete option from the Update Menu.
Querying database file on single and multiple keys
In this section you study basic techniques for querying, or searching a database. In other words you will be looking at the techniques which allow you to view records that meet some search criteria, such as all the students of Sirsa city, or all the Amits in the state Haryana.
Querying database file on single key with List
For this you must perform the following steps in Assist menu:
- Open the Retrieve menu and select List
- Select a Build a search condition
- This will open the list of field names appears on the screen, as shown in figure H
- Select the field that you want to search, says Semester, and press Enter.
- This will open a menu of operators on the screen as shown below:

Figure H
Here you are looking for semesters that equal to Second, so select ‘= Equal To’ option and press Enter key
6. Finally you have to specify what Semester should be equal to. The database III Plus displays the prompt:

Just type Second and press Enter key
At this point you will see the command that appears on the Action line at the bottom of the screen:

You have built this command from your menu selection
7. After that you will see following menu:

Select No more condition and press Enter key
8. Finally select the Execute the command option and press Enter key
9. It will asks if the display should be printed, answer No and press Enter key
10. You will get the respective output on the screen.

Figure I
Here the output may wrap around your screen. If you do not want to list all the fields of a record then select those fields which you want to display in the result, as shown in following steps:
- Open the Retrieve menu and select List
- Select a Construct a field list
- Select NAME, SEMESTER, and CITY
- Press → key to leave the field-names menu
- Select a Build a search condition
- Select SEMESTER
- Select ‘= Equal To’
- Type Second and press Enter key
At this point you will see the command that appears on the Action line at the bottom of the screen:
![]()
9. Select No more conditions
10. Finally select the Execute the command option and press Enter key
It will display the following output on the screen.

Querying database file on multiple keys with List
You can query a database file on more than one key. For example, you may display the Name and City for all records with Second Semester and Sirsa City. For such type of querying, perform the following steps:
- Open the Retrieve menu and select List
- Select a Construct a field list
- Select NAME, SEMESTER, and CITY
- Press → key to leave the field-names menu
- Select a Build a search condition
- Select SEMESTER
- Select ‘= Equal To’
- Type Second and press Enter key
At this point you will see the command that appears on the Action line at the bottom of the screen:
![]()
9. After this you will see three option, Select Combine with .AND

Ordering the data on a selected key
When a database file is created, the records are not entered in any specific order. However if you want to arrange records in any specific order you need to sort or index a file on a selected key. Arranging of records in a given order helps dBASE III PLUS to find a record rapidly. Actually the idea of indexing a file and sorting a file is same but the implementation is different. Let us study these one by one
Sorting a Database File
Sorting creates a new database file that rearranges the physical records in order you specify. You can sort in ascending order with The Assistant, and in both ascending and descending order using dBASE III PLUS commands.
If you want to sort a file according to the Roll Number then perform the following steps:
- Open the Set Up menu and select the STUDENT database file and select non-indexed file
- Open the Organize Menu and select Sort
- A submenu containing the fields in the STUDENT database file appears
- Select ROLLNUMBER and leave the menu by press → key
- A drive select menu appears
- Select as drive for the sorted file
- Type ROLLFILE for the sorted file, as shown in figure J
At this point you will see the command that appears on the Action line at the bottom of the screen:

Figure J
- After a few seconds, the screen displays the following messages:
- 100% sorted 6 records sorted
- Press any key to return to Organize menu.
Now if you highlight the Retrieve option and select List and Execute the command options to view the database again, then you will find that the records are not sorted. All this happens because you are viewing the file STUDENT. Thus if you want to view your sorted records then perform the following steps:
- Open the Set Up menu and select the ROLLFILE database file and select non-indexed file
- Open the Retrieve Menu and Select List
- Construct a field list containing the NAME, BRANCH and ROLLNUMBER
- Press → key and select Execute the command
- Direct the output to the screen and you will see that the records are arranged in roll number ascending order
This process shows that the sorted records are stored in another file, say ROLLFILE in this example. However you can also store sorted records in the same file, say STUDENT, by using the COPY option. After opening the ROLLFILE, you can copy it to the STUDENT file by performing the following steps:
- Open the Organize Menu and Select Copy
- Select a drive
- Type STUDENT as the name of the database file to copy to
- Select Execute the command
After this the dBASE III PLUS shows the following message (just for avoiding the overwriting process accidentally):
STUDENT.DBF already exists, overwrite it? (Y/N)
Now if you press ‘Y’ key then the existing contents of he STUDENT file will be replaced by the data in ROLLFILE.
Indexing a Database File
Indexing does not rearrange the physical records in the database file, rather it creates an index file, which points to records containing the certain data, somewhat like the index in this book points to pages containing the certain words.
- Open the Organize menu and select Index
- The dBASE III PLUS displays the following instructions:

Now enter the field name or select it from a field list in front of Enter an index key expression (a key expression is a field on which you will arrange the database file).
3. After select the drive where you want to store the index file
4. The dBASE III PLUS prompts the following message:

5. Type CITYFILE and press Enter key. The dBASE III PLUS will automatically assign the extension .NDX to the file name you provide.
- After a few second, the screen displays the following messages:
- 100% indexed 6 records indexed.
Using an Index File
If you want to use an index file then perform the following steps:
- Open the Set Up menu and select Database File
- Indicate the appropriate drive, and select STUDENT from the file submenu
The dBASE III PLUS prompts Is the file indexed?[Y/N]
- Type Y
- Select an indexed database file ROLLFILE as shown in figure K

Figure K
The word MASTER appears next to the file name. This means that ROLLFILE is used to index your database file, if you display, edit, or retrieve data from it.
- Press → key to exit the file submenu
- Open the Position menu and select SEEK
- The dBASE III PLUS prompts the following message:
The expression you enter must be a value of the first key field. Since the first key field in CITYFILE index file is CITY, you will enter a city name.
- Enter ‘SIRSA’ in quotation marks and uppercase letters. The dBASE III PLUS seeks the first record with a city of SIRSA.
- Press any key to return THE ASSISTANT.
The dBASE III PLUS Commands
Earlier you have used the ASSISTANT to perform dBASE III PLUS commands and operations. However you can also issue commands and perform actions at dBASE III PLUS prompt. At dBASE III PLUS prompt, you can have more options and it provides greater flexibility and is necessary if you want to learn programming.
The dBASE III PLUS commands are used at the dot prompt after first exiting The ASSISTANT by pressing the Esc key. The dot prompt appears as a “.” Now you can enter dBASE III PLUS commands. Let us study some important ones.
CREATE Command
The CREATE command creates a database file FILENAME at command as:
CREATE FILENAME (Press Enter key)
After this the same screen opens as shown in figure-1.4. Now select the field names as well as their types and widths as discussed earlier.
USE Command
The USE command selects an existing database file for use, view, or index file for use. The USE command is used as:
USE FILENAME
MODIFY Command
The MODIFY command is used in two ways:
- MODIFY STRUCTURE
- MODIFY COMMAND
The MODIFY STRUCTURE is used to add or delete some fields from the existing database file then it is known as modifying the structure of file. The MODIFY STRUCTURE is used as:
.MODIFY STRUCTURE
It will display the complete structure of the opened file in a format as shown in figure 1.5. If you just want to change the spelling of any field name or field type or field width then come to that field using arrow keys and make appropriate changes. If you want to add any field then come to the last field and press Enter key.
The MODIFY COMMAND provides a text editor that you use to edit a program or to edit memos in a database file. The MODIFY COMMAND is used as:
.MODIFY COMMAND
After this the dBASE III PLUS prompts:
Enter file name :
Just type the filename that you want to edit.
APPEND Command
The APPEND command is used for adding new records at the end of the file. The APPEND command is used as:
.APPEND
After this the dBASE III PLUS opens the structure shown in figure 1.7. Just add record values and press Ctrl and W keys simultaneously.
INSERT Command
The INSERT command is used for inserting new records in between some records. For example, if you want to add a new record after record number 2 then the INSERT command is used as:
. GOTO 2
. INSERT
LIST Command
The LIST command is used to display all or selected records of a database file. The LIST command is used as:
.LIST
.LIST field1, field3, field4
Here the first LIST command displays all the records in row-wise order. The second LIST command displays all the records of only three fields – field1, field3 and field4. Here field1, field3 and field4 are the field name of the given database file. If you have more than 24 records, say 50, then only last few records will be shown to you.
DISPLAY Command
The DISPLAY command displays all the records of a database file page by page. The DISPLAY command is used as:
.DISPLAY ALL
The BROWSE Command
The BROWSE command displays multiple records of a database file in use. The BROWSE command is used as:
.BROWSE
This command shows all the records like a table.
The EDIT Command
The EDIT command is used to edit records, one at a time, with or without a specified format file. The EDIT command is used as:
.EDIT
The DELETE Command
The DELETE command is used to mark the records in the file for deletion. The DELETE command is used as:
.DELETE
For example, the following command
.DELETE RECORD 2
marks record number 2 for deletion. However you can use the DELETE command as:
.DELETE ALL for NAME = “AMIT”
This command will mark all the records having “AMIT” in their NANME field.
The PACK Command
The PACK command permanently removes records marked for deletion from the database file. The PACK command is used as:
.PACK
After this the records that were marked by the DELETE command are deleted permanently.
The RECALL Command
The RECALL command is used to unmark records that were marked for deletion by the DELETE command. The RECALL command is used as:
.RECALL ALL
This will unmark all the records. However if you want to unmark a specific record, say record 2, then the RECALL command is used as:
.RECALL RECORD 2
The INDEX Command
The INDEX command indexes a database file according to a specified expression. The INDEX command is used as:
.INDEX ON field1 TO FILENAME
This command creates an indexed file FILENAME with .NDX extension on field name – field1. The FILENAME.NDX becomes an indexed file.
The SORT Command
The SORT command creates a new file arranged in a specific order. The SORT command is used as:
.SORT TO FILENAME ON field1
This command sorts and creates a new file FILENAME on field name – field1.
The COPY TO Command
The COPY TO command is used to copy data from a currently selected database file to another database file. The COPY TO command is used as:
.COPY TO FILENAME
The REPLACE Command
The REPLACE command replaces current contents of designated fields with specified contents. For example, let you want to replace the every occurrence of name ‘Amit’ with ‘Amitab’ then the REPLACE command is used as:
.REPLACE NAME WITH ‘AMIT’ FOR NAME = ‘AMITAB’
The COUNT Command
The COUNT command is used to count the number of records in a database file. The COUNT command is used as:
.COUNT
The HELP Command
The dBASE III PLUS provides extensive on-line help using the HELP command. The HELP command is used as:
.HELP
After this the dBASE III PLUS opens the Help screen as shown in figure L
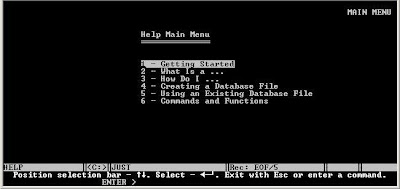
Figure L
Using ↑ and ↓ keys you can move up and down and select the help that you want from the dBASE III PLUS.
History Commands
The dBASE III PLUS stores the most recent commands you have entered in a history buffer. You can use up ↑ arrow key see the commands in reverse order. You can reissue then by pressing the Enter key when you reach the desired command. By default the dBASE III PLUS remembers last 20 command lines.

Like it on Facebook, Tweet it or share this article on other bookmarking websites.